LLM fine-tuning roadmap 2024

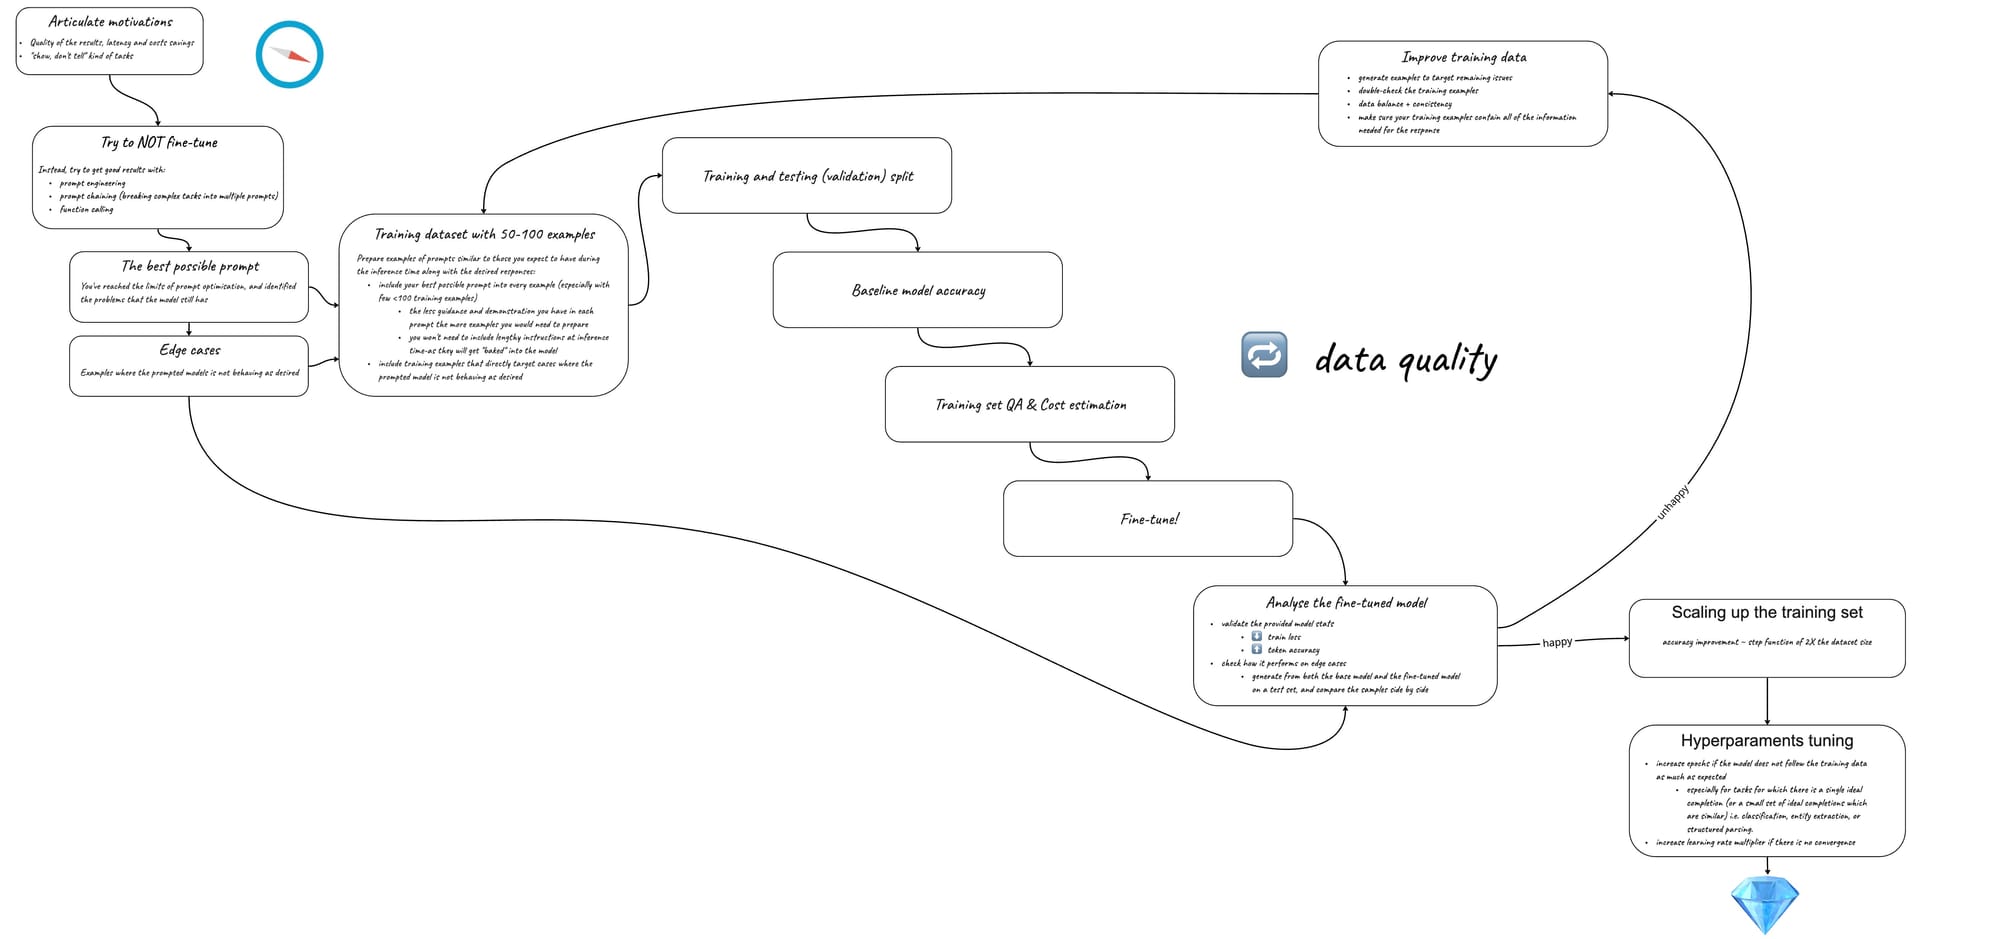
As with many life endeavours, you will get a head-start by having crystal-clear understanding of why you are fine tuning. Any foundation model out there is already pretty smart. It has been trained on vast amounts of text and maybe all you need to do is to give it a little nudge in the form of a couple of examples in your prompt—something called “few shot learning”. However, maybe not all examples you would like your model to be acquainted with fit into your prompt. Or, maybe, you would like to bring down the amount of tokens you send to the model every time, and as a result reduce the response latency and prompt cost. All of those are valid reasons.
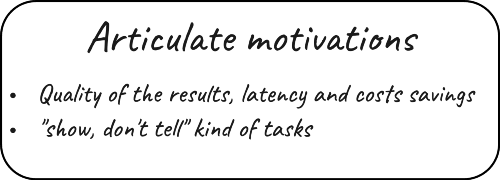
Fine-tuning is a promising technique for the tasks of the “show, don’t tell” nature—something that is hard to formulate in a prompt: adjusting style and tone, dealing with many edge cases, producing more reliable output of a desired format. The outcome of this stage would be a sentence clearly stating what you are hoping to achieve with fine-tuning.
1 Try to NOT fine-tune
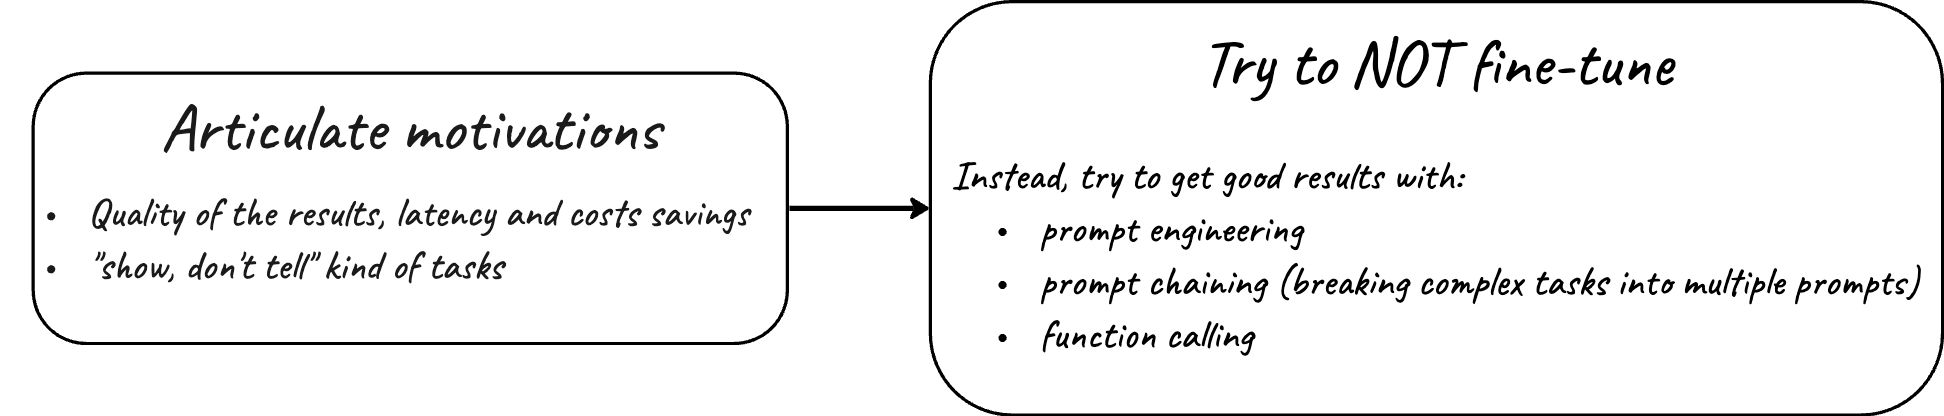
Try really hard to talk yourself out of this idea first. It's a big and expensive effort and you might be better off investing your time elsewhere. For example, you should try all the prompt engineering techniques listed in your model's provider documentation and see if that brings you closer to results you want. Should you have some technical expertise at your disposal, see if equipping your model with some useful functions makes things any better. Maybe a retrieval augmented generation (RAG) or chaining multiple prompts together could work better for you. If you have a team, brainstorm together and see if there are any other options you can try.
The outcome of this stage should be a factual confirmation that you absolutely must fine-tune. This confirmation can be in the form of the prompts you expect your model to handle, your ideal output, and the best output your foundation model was able to provide with all the blows and whistles you put on it.
2 The best possible prompt and edge-cases
At this point you must have reached the limits of what the base model can do for you with prompt engineering. But how do you know that you reached the limit? With all the prompt engineering techniques you had at your disposal, the model still provides unsatisfactory results for some (or most) input examples. Beautiful! We are after those examples. Make sure you persist the inputs and less-than-optimal responses from the base model—that’s the dataset of our edge-cases. It is valuable and will be reused multiple times during your fine-tuning process.
The outcome of this stage is the best possible prompt template you were able to muster. Plus, the persisted data set of inputs and outputs, which are below your quality threshold.
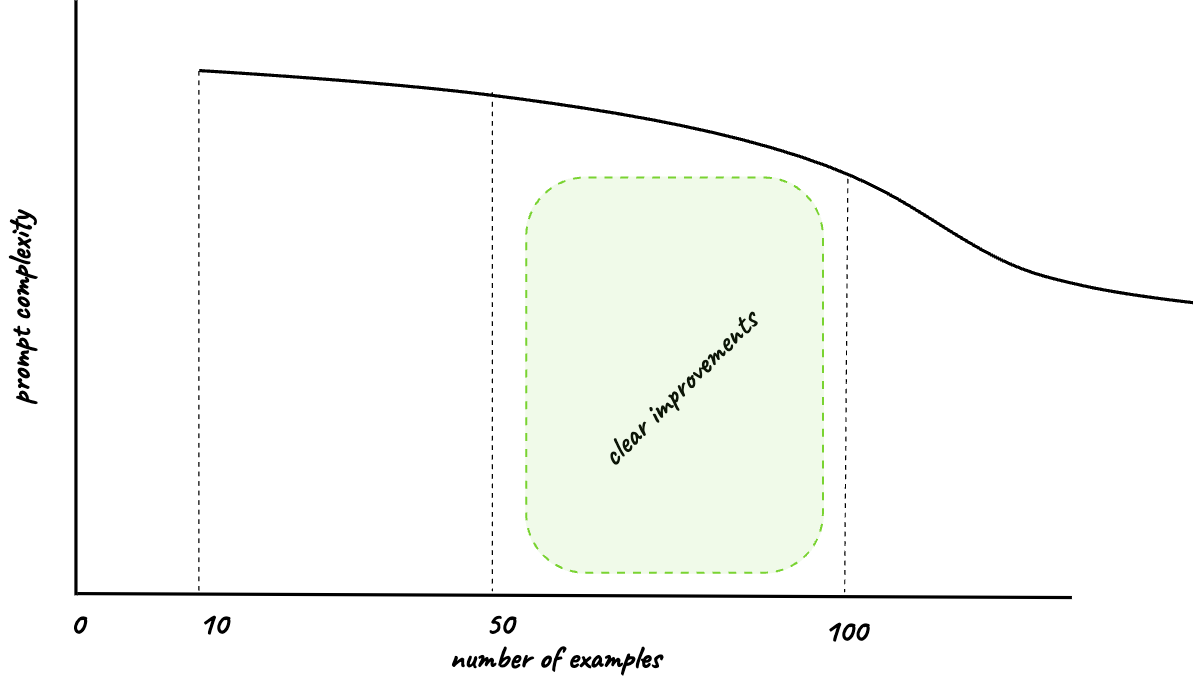
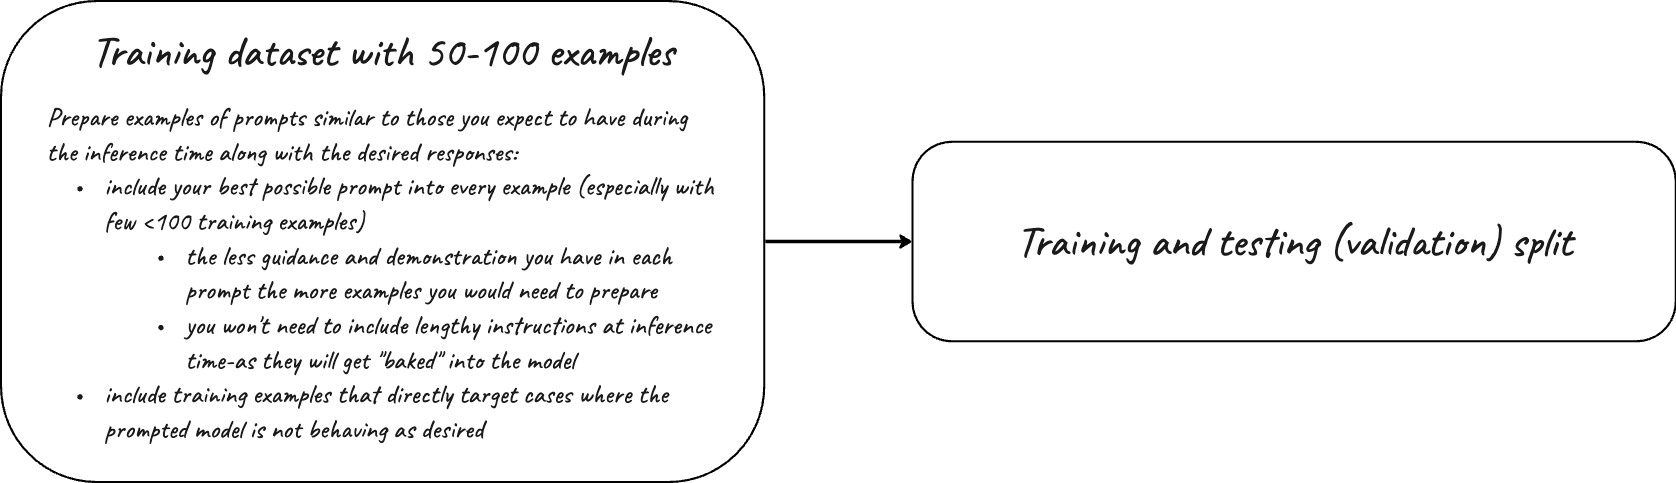
3. Your first training dataset with under 100 examples
Now it is time to build the first training dataset you are going to do the first round of fine-tuning with. It should not be a big one. We are aiming for quality over quantity. If you do everything right, you should see clear improvements with fine-tuning on less than hundred examples.
Usually your training dataset consists of tuples of prompts you expect your fine-tuned model to deal with and the preferred responses.
It is important to make use of your best possible prompt template from step 2 in every single prompt in your training dataset. This is especially true for cases where producing good-quality training examples is difficult—the less prompt engineering effort you put into every single training prompt, the more examples you would need to come up with.The cool thing is, once your best-effort prompt-template gets “imprinted” on the model during the fine-tuning stage, you won’t need to use your best-effort lengthy prompt template during the inference time.

Now also is a good time to make use of the edge-cases dataset from step 2 as well. Make sure that your training dataset includes some of those or similar cases.Now, you have your first training dataset with under a hundred of high-quality, partially hand-picked examples and edge-cases. You also made sure to include your best-effort prompt template in every training example.
4. Split the dataset into training and testing subsets
As you go over iterations of improving your training set and fine-tuning you want to make sure you are comparing apples to apples. Thus, you should split your initial training dataset into training and testing (i use this term interchangeably with validation) subsets. Don’t forget to persist both. Most of the model providers make use of both datasets to provide you with the statistics on how much the model is improving during the fine-tuning phase.
Furthermore, after each round of fine-tuning you would make use of the testing subset to see if the newly-fine-tuned model performs better on those compared to the base model and/or previously fine-tuned model.
You now split and persisted your training dataset into training and testing subsets.
5. Measure the accuracy of the base model
You can now use your testing set together with the best-possible-prompt to measure the accuracy of the base model. This is the first time when you would need to define your approach and procedure for testing accuracy—comparing how close the modal response is to the desired response you provided in the testing set.

The more effort you invest into making this procedure smooth and replicable on different datasets, prompts, and models the more time you would save yourself down the line.
6. Bonus points — training set quality assurance and cost estimation
You get bonus points for developing a framework for testing the data quality of your training set and estimating the fine-tuning cost. Given that the training set can often be compiled manually and your model provider expects a strictly defined format—define a procedure to validate your data formatting.

It is also a good time to calculate the amount of tokens you are planning to feed into the model for fine-tuning. This allows you to estimate the fine-tuning round cost: base cost per 1k tokens * number of tokens in the input file * number of epochs trained
7. First round of fine-tuning
You are now ready to use your training and testing sets. Don’t worry about the hyper-parameters like epoch, learning rate multiplier, etc. for now. Keep the default values and kick start your fine-tuning job. It is a good time to take a break, stretch, go for a walk, and get a cup of coffee. Whatever it is that you do when your models are training. For me the fine-tuning job never took less than half-an-hour.

Yay! After a short wait your first fine-tuned model is ready for action.
8. Analyse the fine-tuned model
Time to compare if the first round fine-tuning brought you any closer to the desired outcome. We are not aiming to have a near-perfect outcome, yet, but we do expect to see a minor improvement in the responses quality and overall accuracy. Remember, you established a procedure for measuring just that in step 5?
First thing you can do is look at the fine-tuning statistics file. Usually it is a csv that provides step-wise training metrics. You want your training loss to decrease and your token accuracy to increase over time. If this is not the case, you might want to go back to the drawing board and review your best possible prompt or the training dataset or both.

Then, run your fine-tuned model through your accuracy evaluation procedure using the testing set. Here, we also hope for a minor improvement.
Finally, make sure to check if the fine-tuned model started performing any better on the edge-cases you identified and persisted earlier. You can compare the baseline and fine-tuned responses next to each other.
9. Improve training data — rinse & Repeat
If you did not check one of the boxes in step seven—chances are you might want to improve the accuracy of your training set. There are few things you can do:
- generate examples to target remaining edge-cases
- check that the training dataset is well-balanced (for every specific use-case it would mean a different thing)
- check that your training dataset does not have contradicting examples
- make sure that your training examples contain all the reference information needed for the good response
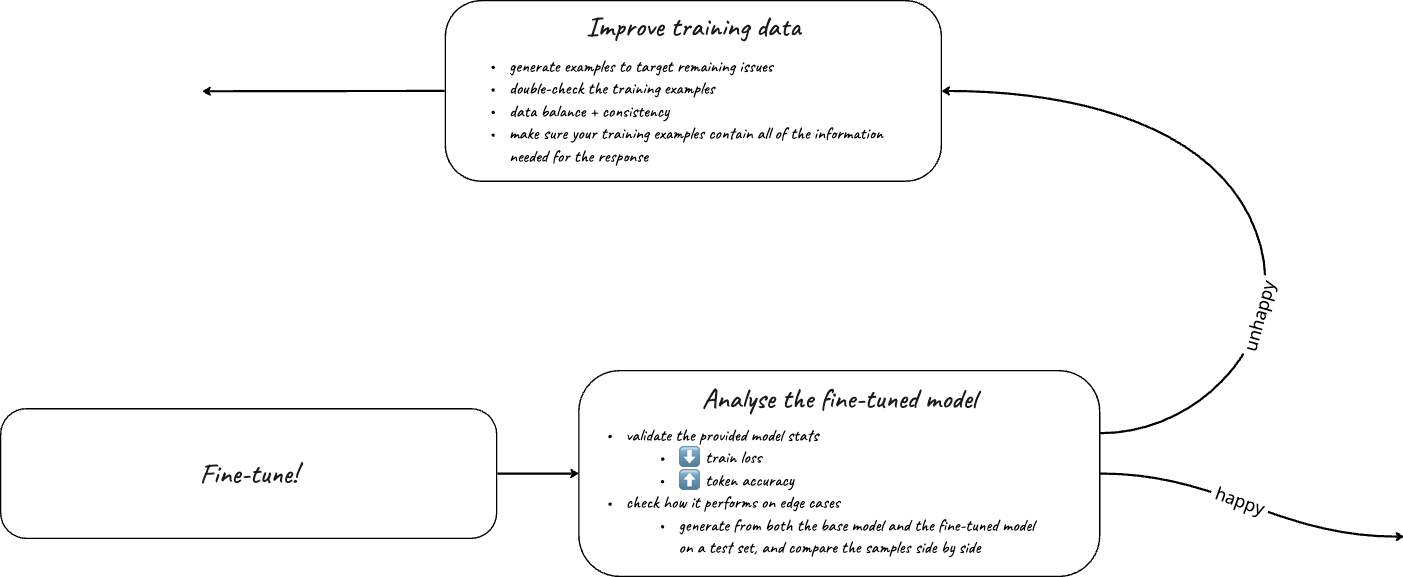
You can now repeat the fine-tuning cycle with the improved training set. Remember—we are looking for a minor improvement in the accuracy and quality of responses.
10. Scaling up the training set
Now that you proved that even with the small training set the fine-tuned model started outputting slightly better results, you can think of scaling up your training set. Try not to compromise the quality of your training data—your final model will be as good as your training data. It’s time to go through the fine-tuning process again. Expect to see a similar level of improvements every time you double your training set.

11. Hyperparameter optimization
See if fine-tuning your model on the final training set brought you to a place where you are happy or almost happy with the results. Only then it is time to think about optimising the hyperparameters of your fine-tuning job.

Here are some generic guidelines for this process:
- if you would like the model to follow your training examples more closely increase the number of epochs—and vice-versa
- increase the learning rate multiplier if the if your training loss did not stop decreasing or did not reach the minimum value—try increasing the learning rate
Final guidance
The fine-tuning process is not something you are likely to pull off in one afternoon. Your intent should be one of measuring and documenting every step of the way. So that if you get lost it is easy to trace back the exact point where things started going south.
Give yourself time to iterate, catch an insight or two about your problem, your data, your evaluation methodology. Work with you team. Try to explain them the reasoning behind your decisions.
Your custom fine-tuned LLM will benefit from every layer of polishing you give to any of the above-described stages. Good luck!
P.S. It's dangerous to go alone! Take this.